Community Pages
Private Digital Cash. Welcome to our home! AEON is an open source project, and therefore it’s life comes from the AEON community; the regular people who decide to follow and help build the project.
Setup AEON Command Line Wallet on Ubuntu
This How-To will walk through the process of setting up and running the AEON local daemon and cli-wallet on Ubuntu 16.04. The process should work similarly on other flavors of Linux.
Requirements
- Ubuntu 16.04
- 2 GB RAM (AEON will use < 0.5GB RAM when running)
- 20 GB available hard drive space (as of Oct 14, 2018, the AEON blockchain files use about 7.0 GB of disk space)
- The latest version of AEON
First, we need to download AEON to our Ubuntu machine. Navigate in the browser to:
https://github.com/aeonix/aeon/releases
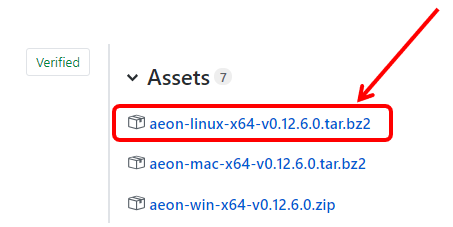
NOTE: Make sure you get the 0.12.6.0 release or later, as it has some important security and stability fixes. The latest release should always be listed first on the page.
Use the Provided Linux 64-bit Binaries
This option is easiest, if the binaries will run on your version of Linux. Note that you must be running a 64-bit Linux operating system. These should work fine on recent versions of Ubuntu.
(If you find that the provided binaries will not run on your Linux system, you have the option to download and build the binaries on your own system. This will be covered in a later guide.)
To download the provided binaries, click on the “aeon-linux-x64-v0.12.6.0.tar.bz2” link, and save the file. This will likely save the file in your Downloads directory, unless you specify another location.
NOTE: To enter the commands in this tutorial, you will need to be logged into your Linux machine with a Terminal program, or from the Desktop you can open the Terminal Emulator that is provided with your version of Ubuntu.
NOTE: In the pictures below, each command begins after the command prompt. On my system, the command prompt always starts with “minnow@faramir:” followed by the current directory path, and ends with the dollar sign character ($). So the first command in the below picture is “mkdir App”. As you follow along, type the commands after your command prompt in your terminal window, and press the Enter key after typing each command.
First, we should set up a directory for our aeon apps. It will hold any versions of Aeon we install, and any mining software we may install later. I will create a new directory within my home directory, called “App”. If you choose a different name, be sure to use your directory name in place of “App” in any below commands.

Next I will unpack the file I downloaded, into the App directory, using the “tar” command. In the picture below, the command is on the first line. This assumes you downloaded AEON to your “Downloads” directory. If you downloaded it to a different location, you will need to replace “./Downloads/” with the correct directory of the file on your machine.
NOTE: The period-followed-by-slash (./) in the commands signifies "the current
directory". I am running this command from my home directory, and the "Downloads" and "App"
directories are both located there. That is why you see
"./Downloads/..." and "./App".
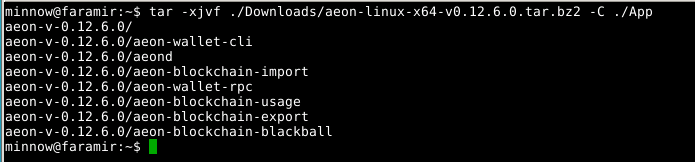
From the 8 lines of output above, we can see that a new directory was created inside our App directory, called “aeon-v-0.12.6.0”. All of the provided binaries now exist within that sub-directory.
To validate that everything looks right, you can use the “cd” command to change to the new directory, and the “ls” command to list all the files in that directory. This is shown in the below picture:

Notice the 7 green files listed below the “ls” command. (You may not see them in green.) Those are the AEON binaries.
In this tutorial we will be using the aeond and the aeon-wallet-cli binaries. You can run them from within this directory.
Running the Local Node for the First Time
The aeond binary is the Local AEON Node application. (It is also known as the “aeond daemon”.)
When running for the first time, your node will download the entire AEON blockchain to your computer. To speed up this process, we run the node with 2 parameters as follows:
./aeond --block-sync-size 1000 --max-concurrency 15Make sure you enter the command with the correct dashes and spaces!
You should see the AEON node output in your terminal window as shown below:
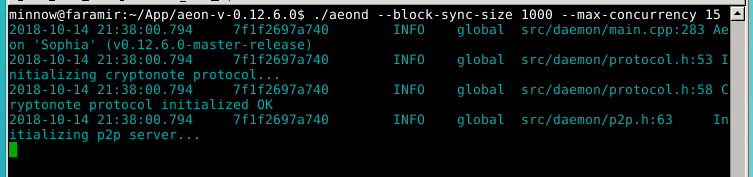
Note that you want to see the correct version # in the first output line. In this case “(v0.12.6.0-master-release)” is correct.
You should see further down, a message that begins “The daemon will start synchronizing with the network.” And finally, you should see the message “SYNCHRONIZATION started” before a pause.
The synchronization process can take 2 – 4 hours (or more) to complete, depending on your computer. You will see some progress messages in your terminal window along the way. So now you can go do something else productive while you wait!
When your node has finished sync’ing the blockchain, you will see a final message as shown below:
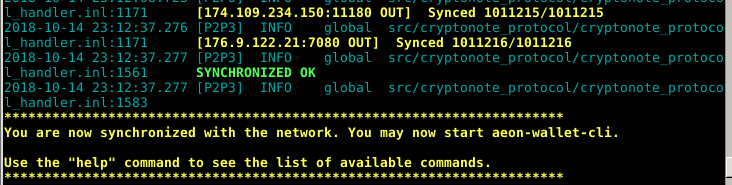
Congratulations!! Your local node is now running and fully synchronized with the AEON blockchain!
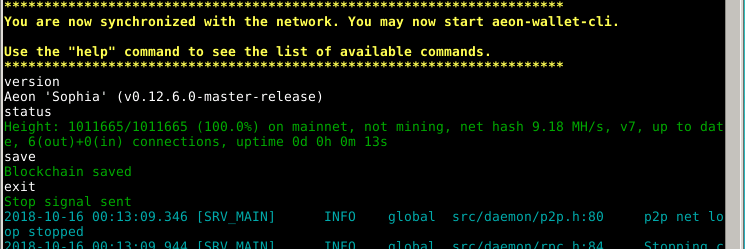
As you can see in the picture above, you can enter commands to your node in this window. The help command will show a list of all available commands.
The version command will tell you what version of the daemon you are running. The status command will show a line of useful information, including: the current block height, the total hash rate on the network, and how long the daemon has been running. The save command will ensure the blockchain is saved, and the exit command will stop the node and exit. These commands and their output can be seen in the picture below.
NOTE: After your node has sync’d for the first time with the blockchain, you may subsequently start it from the command line without the extra 2 parameters, by simply entering: ./aeond
Running the CLI Wallet for the First Time
Your wallet will connect to the AEON network through your node, so first make sure that your node is running in a command terminal. Then, open a 2nd terminal window so you can run your wallet.
In your newly opened terminal, change to the directory where your AEON binaries are, and run the aeon-wallet-cli application as shown below:

(Note that your binaries may be in a different location than the “App” directory in the examples.)
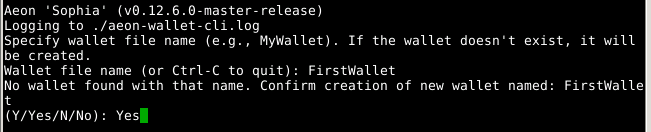
First, you will need to enter a name for your wallet. I have entered FirstWallet as the name in the example below, and am entering Yes to confirm.
Next you will be prompted to enter a password for your wallet. You will need this password whenever you run the cli wallet to open your wallet, so do not forget your password. You should make this a strong password, so that it cannot be guessed if someone gains access to your wallet files. You will be asked to type your password a 2nd time to confirm.
Finally, you will be asked to choose the language for your wallet’s seed words, after which your wallet will be created as shown the picture below:

The first thing you will see is the very long primary wallet address (beginning with Wmsrb2… in the picture above), followed by the not-quite-as-long view key. People can send AEON coins to your primary wallet address, and they will appear in your wallet. You can copy these into a document to save them if you want, but you can always see them from within your wallet by using the address command and the viewkey command.
After some brief instructions, you can see your wallet’s 25-word “seed” (mostly covered in the middle of the picture above). You should follow the advice in the “NOTE” on the screen. These 25 words are the only way to recover your wallet – and all of its funds – in the case that this computer crashes and the wallet files are lost. If someone steals this seed from you, they can gain access to your wallet and all of its funds. You should write down the seed words in order from left to right, starting with the 1st line, then the 2nd line, then the 3rd line. Store them somewhere very safe; generally not on the same computer that might crash or get hacked.
Last you will see a summary of your wallet’s accounts and balance. There is only 1 primary account, and a balance of 0 for a new wallet.
Your wallet is now running connected to your node, and will automatically refresh the balance should any coins be sent to it. You can enter commands after the prompt at the bottom of the screen. Enter help to see a list of available commands. In the next section we will explore some of the CLI wallet commands.
Useful CLI Wallet Commands
Some useful commands are:
the balance command, which shows your wallet’s balance
the exit command will properly save your wallet data and exit the application
the password command, which allows you to change your wallet’s password
the refresh command, which forces an immediate refresh if you are impatiently awaiting the arrival of a payment.
the save command, which saves your wallet data
the status command shows whether the wallet is synced to the node
the version command shows the AEON release version number
the viewkey command shows the view keys for your wallet
The “address” Command and Receiving Payments
The address command allows you to see any addresses in your wallet (your primary address by default). Enter address all to see all addresses within your wallet.
You can also use the address command to create new addresses within the same wallet. Let’s say I want to create a new address for the sole purpose of receiving payouts from mining AEON. I could create a new address and give it the label “Mining Payouts”. Then if I want to create an address to receive donations, I can create another address with the label “Donations”.
The picture below shows my command to create the Donations address. Note that it has the ID number 2. The primary address is always ID # 0, and I first created the mining payouts address as ID # 1.

To receive a payment, simply provide one of your wallet addresses to the person who wants to send you some AEON coins. They will transfer coins from their wallet to your address, and after a short time the coins will appear in your wallet balance.
Sending AEON: the “transfer” Command
To send AEON from your wallet to another wallet, you will use the transfer command. The basic usage is as follows:
transfer [<priority>] [<ring_size>] <address> <amount> [<payment_id>]The result is that you will transfer the specified amount of AEON coins to the specified wallet address.
The priority value is directly related to the transaction fee that will be charged; higher priority transactions will be fulfilled more quickly for a higher fee. Valid values in order of priority are: unimportant, normal, elevated, and priority. If omitted, the default transaction fee is used.
ring_size is the number if inputs to use for untraceability (including your own input). The default ring size is 3, and a ring size of 2 is not allowed. A ring size of 1 is only allowed in 10% of transactions within each block, and results in full visibility of the send/receive addresses on the blockchain. A ring size larger than 3 may increase the transaction fee, but provides a greater degree of privacy for the sender and receiver.
An optional payment_id may be used for accounting purposes, so the sender and receiver will know what the payment was intended for.